Decisions are the central part of a decision point. This section covers the configuration of different types of decisions and their effects on a workflow. Some of this is also described in the Organizer user guide which may be consulted in parallel.
Decisions are defined in the code list DSG – DECISIONS_CL.
The code list for decision types is shared across all applications that uses Organizer. In a multi-application environment, an administrator can decide for which applications a decision type should be available, see section Decide which applications an item type should be available in.
|
For information on codelists, see section Codelists and its subsections. |
Each row in this code list contains a decision alternative and a number of parameters defining what effects this decision alternative will have on the workflow. In contrast to the Decision points, the Decisions should not be regarded as general place holders. They are instead specific decision alternatives with the purpose of (with a few exceptions) appear in a specific decision point in a specific workflow.
The code list for Decisions is rather complex to read, and is easiest understood by adding a new decision or opening an existing one for editing. A panel will then open, which clarifies the use of the many parameters available for a Decision.
Each Decision has a specific Decision type. The Decision type defines what function (or effect) the decision will have. There are five different Decision types.
Decision type |
Function |
CONTINUE |
The workflow will continue |
CLOSE_TASK |
The workflow will be terminated, the task will be closed |
INSERT_TEMPLATE |
An entire task template will be inserted in the workflow, after the current Decision point |
INSERT_FILTERED_TEMPLATE |
Part of a task template will be inserted in the workflow, after the current Decision point |
NEW_TASK_IN_PROJECT |
A new task will be created in the current Project |
Some of these Decision types will require the setting of one or several parameters in order to achieve the intended effect. The below table summarizes some of the most important steering mechanisms that are avaiable and how they are achieved. There are additional possible combinations that would give additional effects, but the table includes examples of the most common and important ones.
Decision type |
Function |
Parameter 1 for triggering mechanism |
Parameter 2 for triggering mechanism |
Parameter 3 for triggering mechanism |
Parameter "Start next" in existing workflow |
Parameter "Start first" in inserted workflow or in inserted new task |
Parameter "Start labeled workflow item" |
Comment |
CONTINUE |
The next item in the current workflow will be started manually. |
|
|
|
|
|
|
The workflow will be paused until someone starts next activity (or decision point) manually. |
CONTINUE |
The next item in the current workflow will be started automatically. |
|
|
|
Checked |
|
|
The workflow will move on, the next activity (or decision point) will be started automatically. |
CONTINUE |
The next item in the current workflow will be started automatically, together with an additional item specified by a Label. |
|
|
|
Checked |
|
Enter Label |
Starts two parallel activities/decision points in the workflow. |
CLOSE_TASK |
Close task automatically. |
|
|
|
|
|
|
Terminates the workflow and closes the task. |
INSERT_TEMPLATE |
Insert an entire task template in the current workflow. Start next step. |
ID for task template |
|
|
|
Checked |
|
Makes it possible to make a predefined extension to the workflow, where an entire template (can be a small template with only one or few activities/decision points) is inserted. |
INSERT_TEMPLATE |
Insert an entire task template in the current workflow. Start several items as the next step. |
ID for task template |
|
|
Checked |
Checked |
Enter Label |
Makes it possible to add activities/decision points by a template, and subsequently start three parallel items in the workflow. |
INSERT_FILTERED_TEMPLATE |
Insert part of a task template in the current workflow. |
ID for task template |
Enter Label pointing out the item from which to start the inserted sequence |
Enter Label pointing out the item where to end the inserted sequence |
|
Checked |
|
This construction is useful for repeating a sequence of the current workflow, creating a loop. The template-ID should then be set to the template of the current task and labels should point put the starting and ending items for the section to be inserted. Finally, the first activity in the inserted workflow is started.. |
NEW_TASK_IN_PROJECT |
A new task is created automatically in the same Project as the current task. The first item in the new task is started automatically. |
ID for task template |
|
|
|
Checked |
|
This construction is useful for creating and starting a new parallel task in the current project. In this example, the first item (activity/decision point) in the new task will be started, while the current task is paused. |
NEW_TASK_IN_PROJECT |
A new task is created automatically in the same Project as the current task. The first item in the new task is started automatically. |
ID for task template |
|
|
Checked |
Checked |
|
This construction is similar to the previous example, with the difference that here the current task will not be paused, but continue since its next item (activity/decision point) is started automatically. |
Labels as parameters in Decisions
In the table above, some boxes says "Enter Label". This denotes a construction for pointing out an activity type or decision point type in the workflow. Below, the specific use of Labels in Decisions are described. For more general information about how to assign Labels in Organizer, please reference the section Labels.
For Decisions, Digpro has reserved a number of predefined labels, which are recommended to use. These are:
•DECISION_TEMPLATE_START_1
•DECISION_TEMPLATE_START_2
•DECISION_TEMPLATE_START_3
•DECISION_TEMPLATE_END_1
•DECISION_TEMPLATE_END_2
•DECISION_TEMPLATE_END_3
These Labels are available for activities, decision points and milestones.
Configuring complex Decisions, an example
Configuring complex decisions is sometimes felt difficult to understand. In this section, an example of inserting a loop (repetition) in an existing workflow is presented together with detailed explanations of how this is achieved.
The workflow in this task has eight activities and two decision points.
In the decision point Decision_Approve it should be possible to, based on the result of the Quality control, approve the Building workflow item and continue, or to disapprove the Building workflow item. On an eventual disapproval, the acitivities Building for correcting the shortcomings and Quality control for a repeated inspection, should be reinserted. Finally, it should be possible to again make the decision to approve the building work. This sequence is a good example of a need to be able to repeat a sequence in a workflow. For this, two possible decisions are configured in the decision point. These are OK Continue and Revision needed.
These decisions are configured in the code list for Decisions.
First, the decision OK Continue. For this simple decision, only the decision type CONTINUE and a flag to start the next item automatically, are needed.
Then the more complex decision Revision needed is configured.
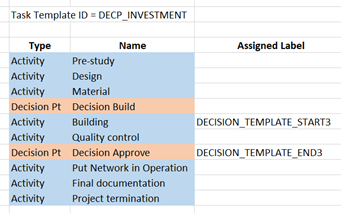
Here, a section of an existing task template should be inserted. For this, the decision type INSERT_FILTERED_TEMPLATE must be used. Several parameters will need to be entered in this case. First, the ID of the task template, in this case DECP_INVESTMENT. (This ID was specified when creating the task template.)
Further, the sequence within the task template to be used for insertion must be specified. This is done by specifying labels for the start and end of that sequence. Here, the label DECISION_TEMPLATE_START3 is used for marking the item (an activity in this case) starting the sequence. The label DECISION_TEMPLATE_END3 is then used to mark the end of the sequence. Note that it is necessary to end with the decision point in order to have the possibility to again make a decision, once the activities have been performed. The naming is illustrated in the below table.
Finally, the flag is set for starting the next step in the inserted workflow. By this, the effect will be achieved that the task will continue by automatically activating the first inserted workflow item, Building. Now the configurations needed in the code list for Decisions are finalized.
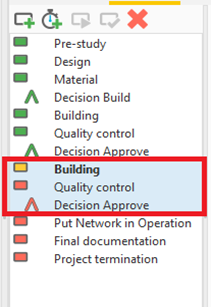
There are still a couple of configuration steps for this example to be complete and to function correctly. It is necessary to assign the two labels DECISION_TEMPLATE_START3 and DECISION_TEMPLATE_END3 to the appropriate workflow items (activity type and decision point type). For this we are using the Organizer panels for assigning Labels to activity types and to decision point types.
A more detailed description of how to assign and manage Labels can be found in a separate section in this guide. Here, the final results of the assignments in the panels are shown.
Adding Decisions to a Decision point
To add Decisions to a Decision point, either in the workflow of an existing task or when building a workflow in a task template, the function Manage decisions is used. A dialog listing Decisions will be presented and the user can move these into the decision point.
As discussed earlier, the most common way of working is to configure decisions in decision points as part of building workflows in task templates.
The result of the configuration example
The configuration is now finalised, and it is possible to test by taking the decision Revision needed and make sure that the outcome is the intended.
As expected, the decision has had the effect that two activities and one decision point has been inserted in the workflow, and that the first inserted activity Building has been started.