Resource registry
General resources
The Resource registry to the Operating order module handles:
•Authorizations and areas of interest.
•Contact information (email, phone and radio).
The resource registry is based on the general dpSpatial user information. Action point number one is to verify that all the users that is intended to use the operating order, are registered in the User manager.
In order to start and use the function User manager, an administrator role is required. Normally this means a dpPower administrator role or a dpPower superadministrator role etc. (possibly customer specific roles). If no customization has been made, the required role should be SUPERADMIN_ROLE. The menu option is found under Administration > User manager. To register internal or external resources according to the following two sections, the role MANAGECODELISTS is also required.
When using the function User manager associated with the Operating order module you need to think about the following:
•Always enter the user name in capital letters.
•There are more fields than those that are shown in the drop-down list. Press the button Edit to enable them.
•Currently the tab Departments has no significance for the operating order.
The relevant fields for the operating order module is:
•User name (the key to both the user account in the database and operating order specific fields).
•First name.
•Surname.
•Email.
•Mobile.
General userinformation
Internal resources
In order for resources to work in the operating order, a prerequisite is that they are registered as regular users according to the previous section above. The exception is different types of resources that lacks an account in dpSpatial (departments, functions, entrepreneurs etc.) Read more about this in the next section External resources.
Internal resources are administrated in a codelist by using the usual Codelist manager. See previous section General resources that describes the authorizations for the function.
1.Start the Codelist manager by selecting Administration > Codelist manager.
2.Select the Codelist owner - Operator (OPERATOR) in the Codelist manager.
3.Select the codelist Internal resources/INTERNAL_RESOURCES_CL.
4.Try to locate the same User name/USER_NAME in the list that is shown. If a User name is missing - press the button New and create the resource. Use capital letters here as in the last window.
5.Select a user and press the button Edit row. The details for this post are shown in a new window.
6.Optionally enter the rest of the fields. None of the fields are mandatory except the yes/no flags. They should be specified to avoid confusion. See section Authorization and interest areas for more information. Note! The users can be deactivated in the operating order module by deselecting Active value/ACTIVE.
7.Save the new information. Press the button Update server and there is a good chance (depending on multiple web servers etc) that the changes will take effect immediately.
External resources
External resources are handled in the same way as internal resources. The exceptions are:
•The codelist is External resources/EXTERNAL_RESOURCES_CL instead of Internal resources/INTERNAL_RESOURCES_CL.
•In the list there are a system generated sequence number (CODENUM) instead of the user name. Since the external resources lacks an account in the system, the user name is irrelevant.
•Email and phone number are handled since this information can not be retrieved from the general User manager.
•It is possible to enter a function (e.g. DRC) and/or a company name.
•Authorizations to create, control and execute an operating order have been removed. It is obviously pointless to define any of this, since there is no account.
External and internal resources are displayed in a single, unified codelist for each field in the Operating order module.
Authorizations and areas of interest
The authorizations and interest areas that are handled are described below:
•To create and amend an operating order*.
•To approve or deny an operating order*.
•To execute and revise an operating order*.
•To be an operation supervisor.
•To be a switch assistant.
•To be a work supervisor.
•To be selected to the list For action.
•To be selected to the list For information.
*) The function is only relevant for users with a system account.
The authorizations and interest areas according to the list above, are indicated with zeros and ones. Zero is "no" and one is "yes". Even if the system is able to run with some yes-/no-fields undefined, it is recommended to feed either a Zero or number One for every field to avoid uncertainties.
Template texts
Commonly formulations in the Description field in the operation rows, are suitably handled as template texts.
Advantages:
•Reduced keyboard typing.
•Reduced risk for typos.
•Possibility to retrieve identities directly from the network documentation.
•Possibility to advanced layouts including read only fields.
•Possibility to mirror operation rows that are customer specific.
•Uniform formulations.
Static template texts
All the template texts are handled in the Codelist manager. See section General resources for authorizations, start and updating the server. Select the Codelist owner - Operator (OPERATOR). Select the Codelist OPERATION_ORDER_ROW_DESC_CL.
This codelist works in the same way as every other codelists. It is possible to edit and uncheck that a text should no longer be active and therefore not will be visible in the list of template texts.
Note! The column COUNTER_DESCRIPTION, where it is possible to map a counter operation that will be used when the point of operation is mirrored.
As any other central information in the Operating order module, current operating orders are not affected by later changes in the template texts. The handling of the template texts follows the standard and it is hence not possible to remove a text by using the tool - enter zero in the field Active value/ACTIVE instead.
Template texts with input fields
It is possible to mix static texts with input fields for dynamic content.
Example 1 |
1.The template text is "Enter your own text here @{1}". 2.When the list with template texts are opened from the operation row, it is the same as has been entered. See above. 3.When the text is selected, a new dialog window is opened and the @{1} is displayed as an input field according to the image below. |
Example 2 |
1.The template text is "Select station in the map and insert it here @{1:station}". 2.When the list with template texts are opened from the operation row, it looks the same as has been entered. See above. 3.When the text is selected, a new dialog window is opened and the @{1} is displayed as an input field with the possibility to retrieve texts from the map/schema. |
Further fields are added with @{2}, @{3} ... @{n}.
If a dynamic value should be used twice in the same text, it is possible to use @{1} (etc.) in two places in the template text.
Line identities/cable numbers can be retrieved if, @{1:station} is replaced by @{1:cable}.
Complex template texts
You can create complex template texts / tags with HTML tags. Knowledge of HTML is required for this, but it is, of course, possible to order the template definitions from Digpro as well.
Complex template texts are mainly used to meet two needs:
•Layout in the style of traditional labels for evidence exchange with fields and dividing lines.
•Fields that must be writable in specific states - during editing, during execution or a combination of these.
These two needs often coincide.
These template texts are entered the same way as other template texts via Administration > Codelist manager > Operator > Operation_order_row_desc_cl.
Note that HTML-based templates should not be used in other template texts (such as "description_cl or operation_order_permit_desc_cl").
Complex template texts support (of course) only a limited subset of the HTML standard. Although it "works", for example, defining a particular font or hard-coded text size, this is generally advised against. The result may not be as desired, for example in PDF or on a 4K screen.
Examples of recommended tags are:
•Tables, rows and cells (for layout of labels).
•Relative text sizes (that is, relatively larger / smaller than standard rather than an absolute text size).
•Colors (usually to mark input fields in the template).
•dpSpatial's own classes to define fields possible to type in.
dpSpatial's own classes to define in which states a field should be possible to type in are based on the head-section in the HTML code containing the text data-dptemplate-version = "2". To see the input fields, definition is also recommended in a style block - for example <style> .editable {background-color: # c0c0c0;} </style>. Finally, the field itself must be tagged in the code. This can be accomplished in several ways. One method is to put a span block around the part of the text that forms the input field (… static text <span class = "editable"> __ </span> more static text ...). Note that there are some placeholder characters in the span block, so that the field is visible in the application. If this feels too complicated, it is probably easier to study the examples.
Note that template texts, defined before version 8.6, may need to be adjusted to be possible to update in desired states. As of 8.6, the following classes apply:
•Editable - fields that are writable Under preparation, For completion and Under revision.
•Editable-perform – fields that are writable in state Executing.
•Editable-active – fields that are writable in all the above states and Approved.
Text templates for Operator in dpWebmap
If the template text is to be used with Operator in dpWebmap, the following must be considered.
The entire page in dpWebmap is based on HTML. Therefore, style definitions (<style> -tags) for cells in the operations/operation rows may interfere with each other. If the HTML templates are to be used in dpWebmap and style attributes are defined, these must be defined immediately in each templates <body> and not as an overall style definition. See example 3 below.
Example 1 - a simple text with an input field that should be writable while the operating order is executed:
"Detta fält (_) ska vara skrivbart, medan resten av texten är skrivskyddad.
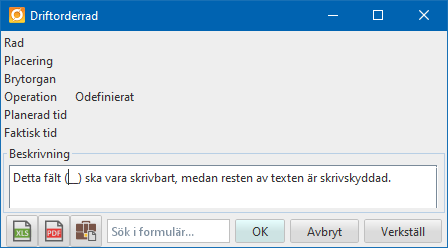
A very simple example that does about the same thing as… {@ 1}… had done without HTML
<html>
<head data-dptemplate-version="2">
<style>.editable{background-color:#e0e0ff;}</style>
</head>
<body>Detta fält <span class="editable">__</span> ska vara skrivbart, medan resten av texten är skrivskyddad.</body>
</html>
Note that this example is simplified to focus on the essentials. In a real case, it is recommended to use a table definition around the text, see example 2.
Example 2 - HTML definition for permit exchange:
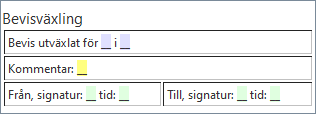
Stylized exchange of permit- acid-colored fields are writable during editing, pistachio-colored fields are writable during execution, while the yellow field is writable in all active states.
<html>
<head data-dptemplate-version="3"><style>.editable {background-color:#e0e0ff;} .editable-perform{background-color:#e0ffe0;} .editable-active{background-color:#ffff80;}</style>
</head>
<body>
<p style="margin-top:0"><font size="5">Bevisväxling</p>
<table border="0" width="100%">
<tr>
<td colspan="2" border="1">Bevis utväxlat för <span class="editable">__</span> i <span class="editable">__</span></td>
</tr>
<tr>
<td colspan="2" border="1">Kommentar: <span class="editable-active">__</span></td>
</tr>
<tr>
<td border="1">Från, signatur: <span class="editable-perform">__</span> tid: <span class="editable-perform">__</span></td>
<td border="1">Till, signatur: <span class="editable-perform">__</span> tid: <span class="editable-perform">__</span></td>
</tr>
</table>
</body>
</html>
Example 3 – template compatible with dpWebmap
<html>
<head data-dptemplate-version="3">
<style>
.submit-date {background-color:# d4f4f4;}
</style>
</head>
<body>
<p>template that <em>may interfere</em> with other templates<br>
Utlämnad, date: <span class="submit-date">_____</span>
</p>
</body>
</html>
This template risks conflicting with other templates that use the same style definition.
<html>
<head data-dptemplate-version="3">
</head>
<body>
<p>template that <em>work</em> with other templates<br>
Utlämnad, time: <span class="submit-time" style="backgroundcolor:# d4f4f4;">_____</span>
</p>
</body>
</html>
This template should not conflict with other templates style definition.
Template texts inside other template texts
The template texts that are used inside a label (see section Text template) are located in its own codelist.
See section Static template texts for general information about the Codelist manager. Change the codelist OPERATION_ORDER_ROW_DESC_CL to OPERATOR_ORDER_PERMIT_CL. Otherwise the handling is more or less identical (for natural reasons counter operations are not handled for example).
The fields Operational state, other and Other in the tab prerequisites have a common codelist. See section Static template texts for general information about the Codelist manager. Change the codelist OPERATION_ORDER_ROW_DESC_CL to DESCRIPTION_CL. Otherwise the functions are similar.