Shape files (SHP) are a common GIS format often used to exchange geographic information between different systems, for example from ESRI products.
|
Importing Shape files requires a mapping file. A mapping file is a file containing information on how to translate data in a Shape file to data in dpPower. |
Generate Shape mapping file
A mapping file is a text file that contains instructions on how to interpret the data in the Shape file and map it to components in dpPower. There are two ways to create a mapping file:
•You can use a built-in tool in the application that helps you create a draft mapping file. The tool reads the content of the Shape file and automatically generates key fields for the elements to be mapped.
•Alternatively, you can create the entire mapping file manually from scratch in a plain text editor.
Use the Generate Shape Mapping File tool
1.Select File > Import > DXF/DWG > Generate Shape mapping file....
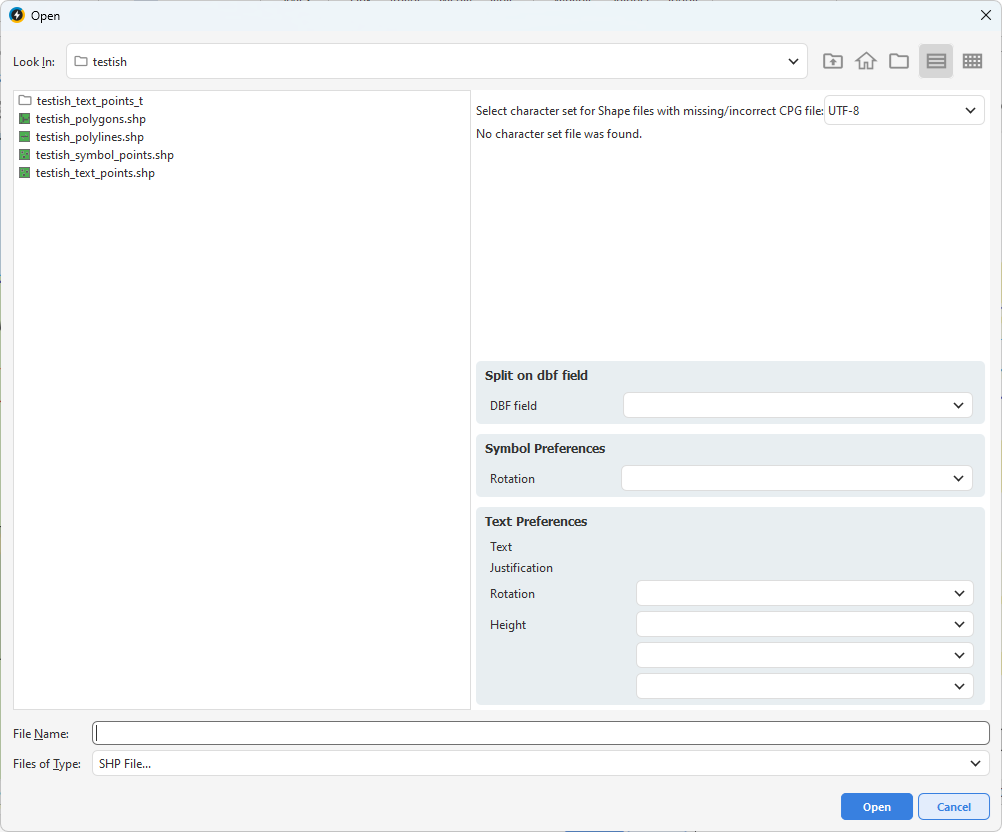
2.Select the desired Shape file in the dialog box.
3.If the file is to be split on any attribute of the shape file, select DBF field.
4.If the file is to be mapped to text components, select fields in Text Preferences.
5.If the file is to be mapped to symbol components, select fields in Symbol Preferences.
6.Press Open.
7.Save the draft mapping file.
8.Open the mapping file in a text editor and complete with mappings to dpSpatial components.
|
Use the Object Metadata Reader function in the administration menu to identify the correct object and component types. See also section Find the right component in dpSpatial. |
Create a mapping file manually
1.Create a new text file in, for example, Notepad.
2.Specify a section for each Shape file, for example [lines.shp*Street].
3.Define attributes such as filename_match, otype, subtype, ctype and any dbf fields.
4.Specify any text or symbol settings for the shape file.
5.Save the text file with a descriptive name, for example "MappingBuildings20250901.txt".
|
Use the Object Metadata Reader function in the administration menu to identify the correct object and component types. See also section Find the right component in dpSpatial. |
Example of mapping file

In the mapping file you can control how shape objects are created in dpPower:
•Which Object, Subtype, Component type and States each shape object should have.
•Text placement - Choose where to place the text by specifying:
otext_placement=start
otext_placement=middle
otext_placeme.nt=end
•Attribute mapping - You can specify which fields in the dbf content of the shape file should be mapped to the corresponding attributes in dpPower.
If you want to import an attribute into a component other than the main component, use the following syntax:
•data_fields=ATTRIBUT_I_SHP=CTYPE.ATTRIBUT_I_DP
Example:
•data_fields=IRNUM=5001.IRN
Here the field IRNUM from the Shape file is imported into the attribute IRN of the component 5001.
Example of mapping file that creates a macro:
[define buildings($subtype, $val)]
filename_match=buildings.shp
otype=
subtype={$subtype}
ctype=
state=0
display_flag=0
dbf_field=type
dbf_value={$val}
data_fields=OSM_ID,NAME,TYPE
[buildings.shp*building]
[use buildings(, building)]
[buildings.shp*historical]
[use buildings(, historical)]
Rotation settings
You can control how rotation of symbols or text is interpreted on import with the angle_unit parameter in the mapping file. The following units are supported:
•DEGREE - rotation in degrees (0-360).
•RADIAN - rotation in radians (0-2π).
•GRADIAN - rotation in gradians (0-400).
•FACTOR_OF_DEGREE - rotation is specified as a factor of degrees (e.g. 0.1 = tenths of a degree).
If you use FACTOR_OF_DEGREE you must also specify:
•angle_unit.offset=0.0
ooffset - Adjusts the zero direction, for example if 0° corresponds to east or north.
•angle_unit.conversion_factor=0.1
oconversion_factor - Converts the value to degrees. For example, set 0.1 if the value is in tenths of a degree.
Set a negative conversion_factor if the direction of rotation in your data is counterclockwise instead of clockwise.
Converting codetext to codenum
In some Shape files, attributes are stored as text values (codetext), for example Forest, Road, Residential. In dpPower numeric codes (codenum) are often used instead, e.g. 27 for forest, 12 for road.
To automatically translate text values into corresponding codes on import, use:
•value_mapping.codetext.altMapping=true
Import Shape file
Once the mapping file is ready, the Shape file can be imported.
1.Create a changeset for the import. If you are not satisfied with the result of the import, you can always undo the changeset, adjust the mapping file and import again.
2.Select File > Import > Shape > Shape....

3.Select the Shape file and its mapping file.
|
You can import several files at once. |
4.Specify the coordinate system for the Shape file.
5.Specify character set for data and mapping file (UTF-8, ISO-8859-1 or IBM850).
6.Check the Warn about unmapped box to see which elements have not been mapped. These are shown at the bottom of the import log.
7.If you are importing background data, check the Background map box. The import will then be much faster.
|
To import as a background map, a primary component must be specified in the mapping file and you must be working in a pessimistic changeset. |
8.Check Treat invalid numbers as null if the Shape file contains invalid number values.
9.Press Import file.
|
Check the result before posting the changeset. Adjust the mapping file and re-import if necessary. |