To visualize the work in the map, it is possible to place symbols or areas that describes the work. These components are automatically visible to all users of the system. The placed component is available for all users. By right-clicking on the component, you can, among other things, print information about the task and some of its reports.
Place task graphics from south panel
1.Navigate the map to the desired position for your task.
2.Right-click on the task/project and select Object > Place component for object.
3.Select the type of component you want to place.
Place task graphics and update task position from east panel
1.Select the desired task in the south panel.
2.In the east panel that opens, select the icons at the bottom left to use the functions. See description below.
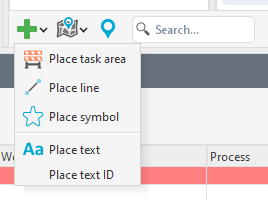
Functions
|
Place task area - Place a task area on the map by drawing a polygon. |
|
Place line - Place a free line on the map. Place the line in the map and add vertexes, double-click or right-click and select Create component when you are satisfied. |
|
Place symbol - Place a symbol in the map. |
|
Place text - Place a free text in the map. |
Place text ID - Place the task ID in the map. |
|
|
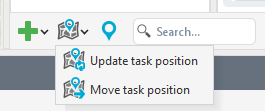
Update task position - Update the position of the task in the map by calculating the position and placing a symbol. The position is calculated as a center of gravity from the task's own graphical components and the graphical components of linked objects. If no position symbol already exists, it is created. |
|
Move task position - Move the position symbol in the map to the desired position. |
|
Show task in map - Pan to the task in the map. |
Enter position for project
Om du, till exempel, har flera utspridda uppdrag i samma projekt kan du markera hela projektområdet.
If, for example, you have several tasks which are spread out within the same project, you can mark the entire project area.
1.In the east panel, select the Project tab.
2.In section Project data, press Place project area.
3.Place a polygon on the map over your project area, right-click, and select Create component. The project area is created.
|
You can place multiple project areas. When a project area is placed on the map, the Show project areas button becomes active and displays the number of project areas. 1.Press Show project areas to pan to placed project areas. If you have multiple project areas placed far apart, you will need to choose which area you want to pan to. |